The Last Day – Progress Report of 18th February

“Unity is strength…when there is teamwork and collaboration, wonderful things can be achieved. The best teamwork comes from men who are working independently toward one goal in unison.” It was the last day of the season. After going through all the struggles, we are finally here. Now it’s the drive team’s turn to start practicing.


DSC_7887
“Continuous effort is the key to unlocking our potential.” ‘Picture of the Day’ (Photo Credit: AJ)
Continue reading The Last Day – Progress Report of 18th February

Progress Update for February 15 & 17


We faced several obstacles, as work towards the completion of our robot. Since last two days, we have been facing some troubles regarding the programming and wiring.  Here are some pictures which definitely captures the tension we had in our team. Hope to fix it soon as possible.


DSC_7585
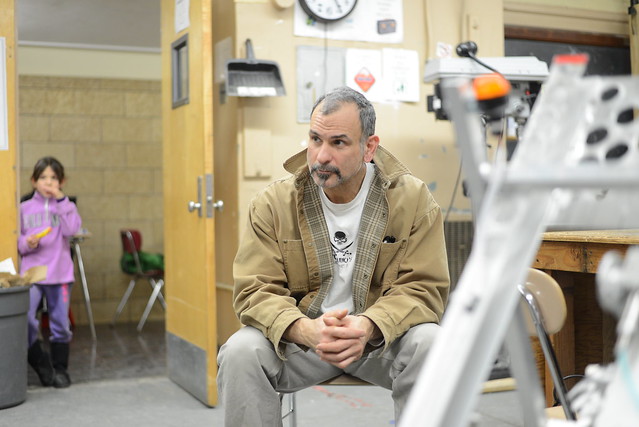
“The Day” Mrs. Gonzalez’s little girl peeks through the door as Mr.Gus (mentor) contemplates on the issue.
Continue reading Progress Update for February 15 & 17

Progress Update of 2nd and 5th February

Testing the catapult in the school gym. We needed to adjust the angle of the shooter, find the starting point from the target and the height of the shooting target. It worked out pretty good and we made progress at the end of the day. Progress update of 2nd and 5th February.


DSC_7112

“Coming together is a beginning; keeping together is progress;and working together is success”…..A succesful shot at last.
Continue reading Progress Update of 2nd and 5th February

Progress Update of 30th January

We already built the prototype robot and are done testing it, it worked pretty good. So now it’s time to modify  and make the actual robot. We recently started making our robot’s parts. Again, the pressure is on. One mistake and we are left behind, as the deadline is approaching. We learned from our mistake while building the prototype, so I hope we will build a hell of a robot now. Wish us luck.

DSC_2582
Picture of the day, by our own photographer, Intishar
Continue reading Progress Update of 30th January

Progress Update of 25th January

Progress update of 25th January.

We are working on the robot’s arm. We have the design, just have to mount everything to its place. Easier said than done. Cutting all the pieces precisely and putting them together in the exact points is lot harder than it looks like. Though there’s a lot of pressure, we have Mr.Gus on our back. If one thing goes wrong, the whole thing goes wrong.
DSC_2398

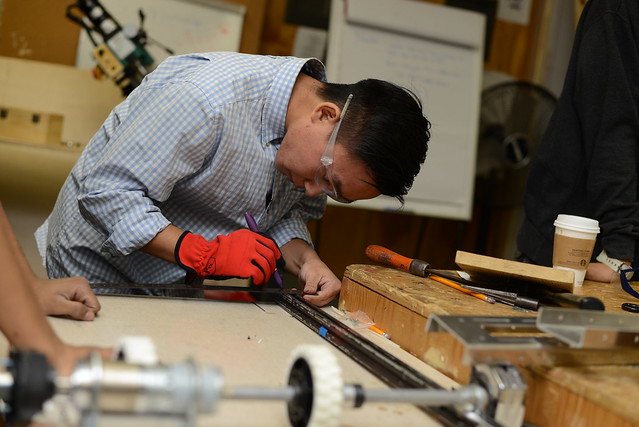
“Everything starts from a single point.” Dojo contemplates as he marks the points on the rod.
Continue reading Progress Update of 25th January

2014 FIRST Game Animation – Aerial Assist


Animation describing the 2014 FIRST Robotics Competition game, Aerial Assist. Robots assist each other to move 24-inch game balls down the field and into low or high goals to score. The more the robots assist each other, the higher their bonus points will be. This animation was first shown at the 2014 season FRC kick-off broadcast in January, 2014. Final production version.

AERIAL ASSIST is played by two competing Alliances of three Robots each on a flat 25’ x 54’ foot field, straddled by a lighting truss suspended just over five feet above the floor. The objective is to score as many balls in goals as possible during a 2 minute and 30 second match. The more Alliances score their ball in their goals, and the more they work together to do it, the more points their alliance receives.

The match begins with one 10-second Autonomous Period in which robots operate independently of driver. Each robot may begin with a ball and attempt to score it in a goal. Alliances earn bonus points for scoring balls in this mode and for any of their robots that move in to their zones. Additionally, each high/low pair of goals will be designated “hot” for five seconds, but the order of which side is first is randomized. For each ball scored in a “hot” goal, the Alliance earns additional bonus points.

For the rest of the match, drivers remotely control robots from behind a protective wall. Once all balls in autonomous are scored, only one ball is re-entered in to play, and the Alliances must cycle a single ball as many times as possible for the remainder of the match. With the single ball, they try to maximize their points earned by throwing balls over the truss, catching balls launched over the truss, and scoring in the high and low goals on the far side of the field.

Alliances receive large bonuses for “assists,” which are earned for each robot that has possession of the ball in a zone as the ball moves down the field. Points are awarded for each action per the table below.

Tags :2014 FIRST Game Animation, 2014 FIRST, Competition, Team 1635, Aerial Assist

Aerial Assist

2014 FRC Kickoff

Today we went to NYU Poly‘s Library to watch the 2014 Kickoff and to pick up our Kit of Parts.

This year’s game is called Aerial Assist.

School not being open, we could not drop off the Kit of Parts.  I’ll either bring it on Monday around 6 or give it to Gus who might be able to bring it earlier.   After a first check it seems we’re only missing the two parts they told us we won’t have:

  • 5 2-position Link Connector (PN: JE150416673) and
  • 5 4-position Link Connector (PN: JE150279733)

On Monday we need to:

  1. Read the game manual before we meet
  2. Brainstorm about robot design
  3. Take inventory (2014 Kit and parts from past years)
  4. Complete the missing part form in TIMS
  5. Install LabView 2014 + Updates on 3 laptops

Getting access to Robot code

To get access to the robot projects you need to:

  1. Download Git from this site.
  2. Open Git Bash.  Depending on the options you picked during install you might have the shortcut on your desktop.  If not look for it in \Program Files\Git\bin\sh.exe.
  3. Once the window opens type ssh-keygen to generate a key pair. This will create a couple of files in your ~/.ssh directory.
  4. E-mail Bob (address in Google Docs roster) asking for access to the code repositories. Attach the public key file to the message.  That is the ~/.ssh/id_rsa.pub file.
  5. After you receive confirmation you’ve been added, open NetBeans and pick Team -> Git -> Clone 
  6. Your screen might look differently when the dialog below opens, but it should have a Repository URL field. Use the settings in the picture.  As you fill in the Repository URL, the dialog fields change to reflect the protocol you picked.  For the private key pick the other file generated by the ssh-keygen program ~/.ssh/id_rsa

Links:

Details about public key encryption.

Learn Java basics: Hello World!

Learn JAVA basics. As any other coding language basic, learn how to print output Hello World!
And then take your learning skills to a whole new level.

So lets start.

Required software: Download and install Java Development Kit. Download and install NetBeans. Steps:

  • Create an IDE project.
  • Add code to the generated source file.
  • Compile the source file into a .class file.
  • Run the program.

To create an IDE project:

  1. Launch the NetBeans IDE.
    • On Microsoft Windows systems, you can use the NetBeans IDE item in the Start menu.
    • On Solaris OS and Linux systems, you execute the IDE launcher script by navigating to the IDE’s bin directory and typing ./netbeans.
    • On Mac OS X systems, click the NetBeans IDE application icon.
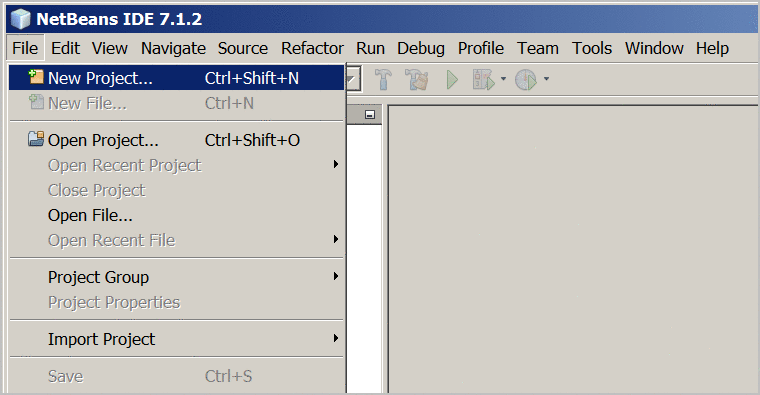
  2. In the NetBeans IDE, choose File | New Project.
    NetBeans IDE with the File | New Project menu item selected. 
    NetBeans IDE with the File | New Project menu item selected.
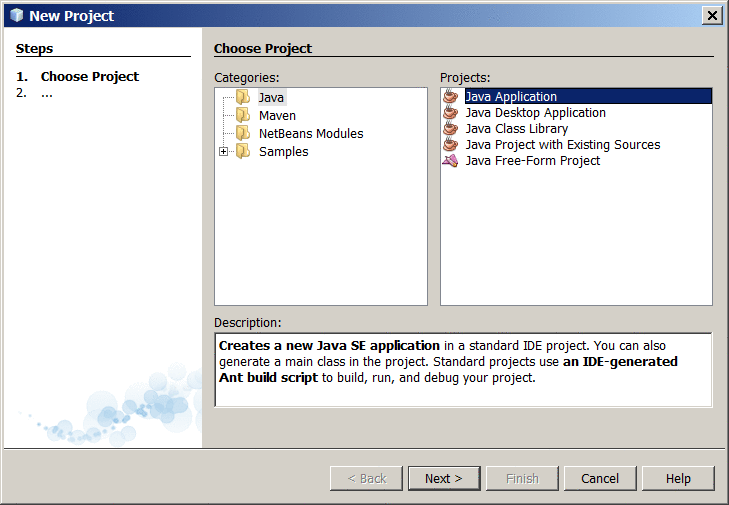
  3. In the New Project wizard, expand the Java category and select Java Application as shown in the following figure:
    NetBeans IDE, New Project wizard, Choose Project page. 
    NetBeans IDE, New Project wizard, Choose Project page.
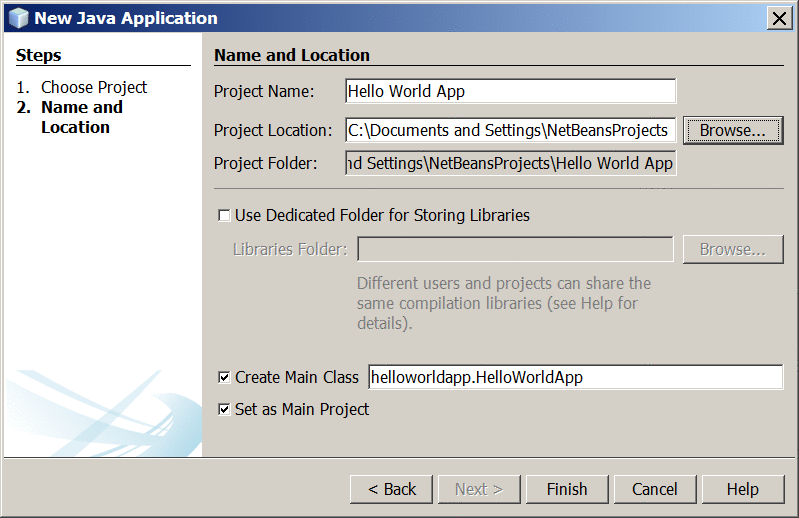
  4. In the Name and Location page of the wizard, do the following (as shown in the figure below):
    • In the Project Name field, type Hello World App.
    • In the Create Main Class field, type helloworldapp.HelloWorldApp.
    • Leave the Set as Main Project checkbox selected.

    NetBeans IDE, New Project wizard, Name and Location page. 
    NetBeans IDE, New Project wizard, Name and Location page.
  5. Click Finish.

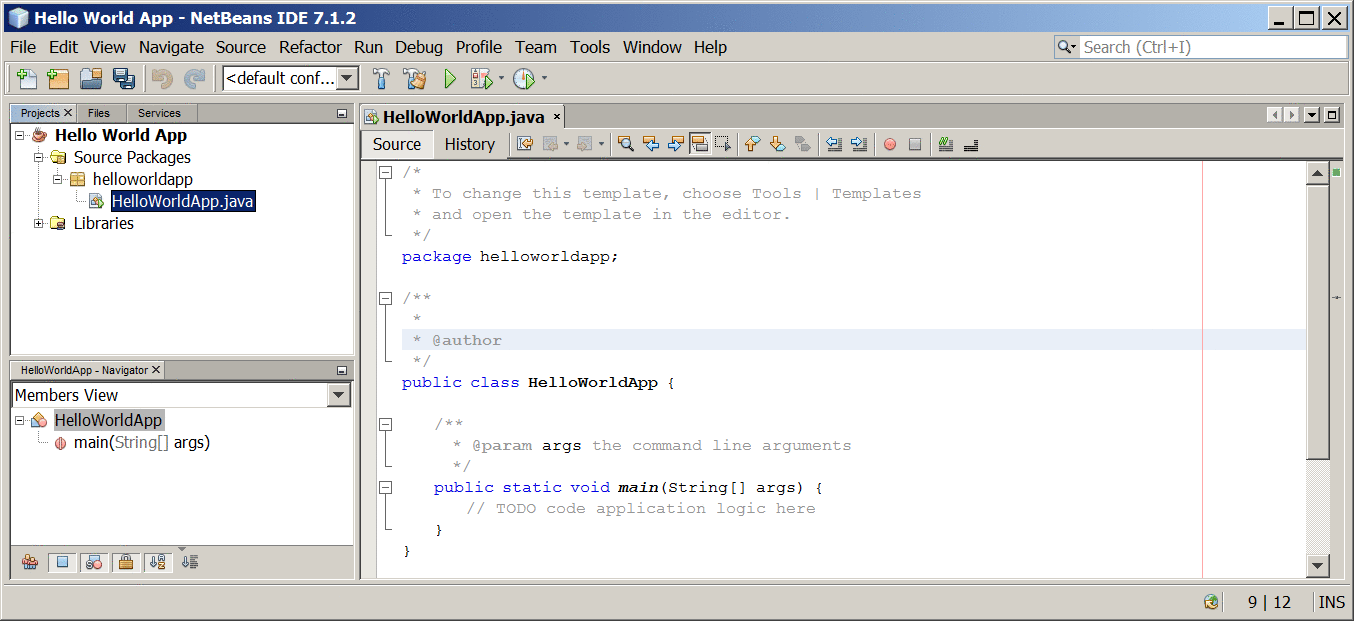
The project is created and opened in the IDE. You should see the following components:

  • The Projects window, which contains a tree view of the components of the project, including source files, libraries that your code depends on, and so on.
  • The Source Editor window with a file called HelloWorldApp open.
  • The Navigator window, which you can use to quickly navigate between elements within the selected class.
    NetBeans IDE with the HelloWorldApp project open. 
    NetBeans IDE with the HelloWorldApp project open.


Add Code to the Generated Source File

When you created this project, you left the Create Main Class checkbox selected in the New Project wizard. The IDE has therefore created a skeleton class for you. You can add the “Hello World!” message to the skeleton code by replacing the line:

// TODO code application logic here

with the line:

System.out.println("Hello World!"); // Display the string.

Optionally, you can replace these four lines of generated code:

/**
 *
 * @author
 */

with these lines:

/**
 * The HelloWorldApp class implements an application that
 * simply prints "Hello World!" to standard output.
 */


Compile the Source File into a .class File

To compile your source file, choose Run | Build Main Project from the IDE’s main menu. Now that you have built the project, you can run your program.

Run the Program

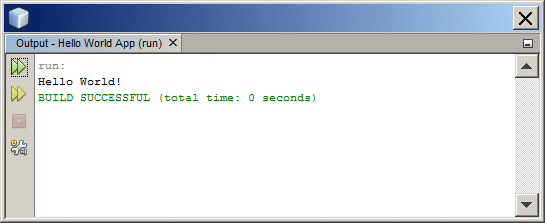
From the IDE’s menu bar, choose Run | Run Main Project. The next figure shows what you should now see.

The program prints Hello World! to the Output window (along with other output from the build script). 
The program prints “Hello World!” to the Output window (along with other output from the build script). Congratulations! Your program works!